Posts

Click event for Dynamically created buttons or fields

Here am using class files to find the control and firing the click event $ ( document ). ready ( function () { $ ( '#contaner_wrapper' ). css ( "height" , "100%" ); $ ( document ). on ( 'click' , '.fc-button-prev a span' , function () { alert ( $ ( "#calendar" ). fullCalendar ( 'getView' ). start . toString ()); var abc = $ ( "#calendar" ). fullCalendar ( 'getView' ). start . toString (); var ab = $ ( "#calendar" ). fullCalendar ( 'getView' ). end . toString (); // Displaymonthevents(); }); $ ( document ). on ( 'click' , '.fc-button-next a span' , function () { // Displaymonthevents(); alert ( $ ( "#calendar" ). fullCalendar ( 'getView' ). start . toString ()); var abc = $ ( "#calendar" ). fullCalendar ( 'getView' ). start . toString (...
Joins in SPQuery

Here am using two lists. 1)Customer 2) CustomerCity Am displaying both lists in gridview. here lookup list is CustomerCity. Lookup is either ID field or Title field while creating list in customer list.      string siteUrl = "http://windows:1122/";             SPWeb _web = new SPSite(siteUrl).OpenWeb();             SPQuery _query = new SPQuery();                         _query.Query = "";             _query.Joins = @"<Join Type='LEFT' ListAlias='CustomerCity'>                           <Eq>            ...

Remove cell's in gridview edit mode

This code is used for removing all cells except first cell(cell[0]). In   cell[0] we will display edit itemTemplate.                     GridView editGrid = sender as GridView;                     int colSpan = editGrid.Columns.Count;                     for (int i = 1; i < colSpan; i++)                     {                         e.Row.Cells[i].Visible = false;                     ...

Bind data in rowdatabound inside gridview based on row type

1).  if (e.Row.RowType == DataControlRowType.DataRow && !e.Row.RowState.ToString().Contains("Edit")) { } This is used for  Edit for Particular Row  inside gridview 2).  if (e.Row.RowType == DataControlRowType.DataRow && dgSmsTemplates.EditIndex == e.Row.RowIndex) { } This is used for  Edit for Particular index (loading Control like editor) inside gridview 3).    if (e.Row.RowType == DataControlRowType.DataRow) { } This is used for  Edit  inside gridview for perticular row (not binding values at runtime)

Sharepoint Tips

Response Redirect in a web part A:- Try going to Page.Response (or SPUtility.Redirect() indeed) System.Web.HttpContext.Current.Response.Redirect([URL Link]); SPUtility.Redirect("login.aspx", SPRedirectFlags.RelativeToLayoutsPage, HttpContext.Current); Getting the URL Query string values in a Web Part A:-the way to use this is Context.Request[string key name]ToString(); string kquery = Page.Request.QueryString[ "kqry" ]; New in SharePoint 2010 CAML Query <IN>,<INCLUDES> &< NOT INCLUDES> Even though Microsoft encourages using LINQ in SharePoint 2010, they introduced some new CAML Query schema elements. They are · IN · INCLUDES · NOT INCLUDES IN: This is something work as same as what we see in SQL Query. We can provide a collection of Items to filter. Previously in SharePoint 2007 we have to use OR operator to do this.. But using OR for multiple times for multiple values will lead to lack in code clarity. So IN operator is c...

How to Recover Deleted Files without Using Software

Image
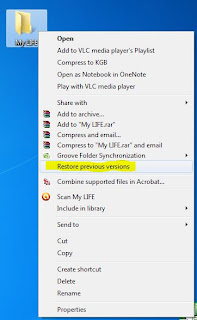
For example lets assume that you have permanently deleted "Heart.JPG" from the folder named "LIFE" ;) , and now you want to recover "Heart.JPG" back. Do this simple trick to recover your Heart.JPG Right Click on the particular folder Select "Restore previous versions" That's all, now you will see a option to recover the particular file. If you don't see "Restore previous Versions" by Right Clicking, Go to Control Panel --> System and Secutiry - -> System --> Click on System Protection (in left sidebar) --> Select the particular drive and Click Configure --> Then select "Restore system setting and previous versions of files" --> Now Click on OK Note : Previous versions come from restore points or from windows backup. This trick will not work at all the time. If you haven't get back your deleted files yet, Use this Powerful Data Recovery Software (Recuva) to recover your deleted files.

How to make Windows 7 genuine using Command Prompt

Image
How to make Windows 7 genuine using Command Prompt Press Windows key + R Now "run" box will appear , in "run" box type CMD  Click on OK Note : Run CMD as Administrator Now command prompt will appear In command prompt type SLMGR -REARM Hit Enter. Wait 5-10 seconds Now a message will appear as shown in image below. Done !!! Now your Windows 7 is genuine .. :D Restart your PC once. Hereafter you won't see the warning message that "Windows 7 is not genuine"